Some Recovering

One of the DIY projects I’ve been excited to do for a while was update the fabric on the chairs in our dining room. Now that I have the gorgeous grey on the walls, the brown had to go.

I’ve looked for fabric for months, with desire never meeting budget. Then someone told me about fabric.com, and I was overwhelmed with affordable options. And I loved that I could order swatches before committing. Eight swatches later, I found the combination of grey and fun I was looking for.

20130510-130612.jpg

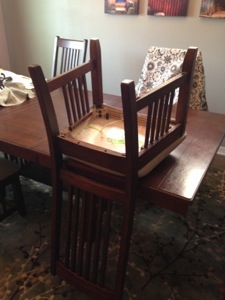
This is the before shot–the tan fabric that came on the chairs eight years ago.

20130510-130758.jpgIf you’ve never recovered chairs before, it’s so incredibly easy! And so deeply gratifying. First, you turn the chair upside down and find the screws keep the seat connected to the chair.

20130510-130810.jpg

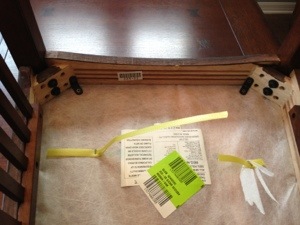
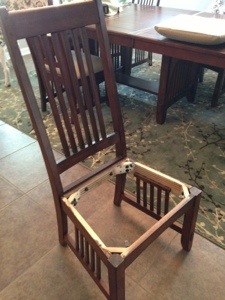
After finding said screws, you take them out and remove the cushion from the base, leaving a seatless chair.

20130510-130819.jpg

I cut a piece of fabric the size of the seat plus six inches (i.e. the cushion was 30-inches wide, so I cut the fabric 36-inches wide to allow for folding and stapling).

20130510-130927.jpg

20130510-130918.jpg

Fold the fabric under a little and staple one side down. The staple the opposite side, pulling the fabric very taut as you staple.

20130510-130912.jpg

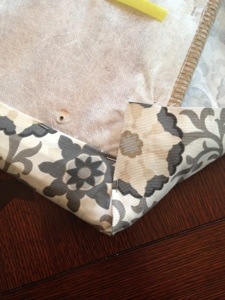
The corners were a little challenging on these cushions, since they aren’t perfect squares. But I worked with the fabric until I liked the looked and stapled as I went.

20130510-130902.jpg

20130510-130852.jpg

And that’s it for the cushion. It was that simple.

20130510-130844.jpgThen you turn the cushion back over, line up the screws, and put it back together.

20130510-130834.jpg

Viola! Isn’t it cute?! Total time commitment. . . maybe 20 minutes per chair. I love how the whole set turned out. Simple, low cost and fast. What more could you ask for?

photo (9)

Giddy

Remember my debate on milk paint versus chalk paint?

I went with the milk paint, solely based on the fact that it was overall cheaper. I am *giddy* with the results! It is exactly what I wanted, and it was so amazingly easy.

Now, regretfully, I don’t have a good “before” picture. I asked my sweet husband if he would help me take the doors off, and he was so quick to get to it that I couldn’t get a picture taken before he had it done. So you’ll have to imagine the pieces put together in all their countryness.

The doors

The doorless cabinet pre-painting

God bless these bronze hardware, but I couldn’t wait to chuck them!

I watched the tutorial on using milk paint on the Miss Mustard Seed website. I’m so glad I did, as milk paint is so very different than latex. Not only do you mix it from powder, but it’s incredibly thin. It goes on like a stain but works more like paint. Watching the tutorial helped me know what was normal. Milk paint is so forgiving. I did absolutely no prep work, it was a little lumpy when I applied it, and I chipped more paint when I applied the wax. The result? Perfection.

The beautiful, perfect, finished project

Isn’t it beautiful?!?!?! I can’t believe I did this and in under 3 hours total. I can’t wait to do it again!

Yes, this hardware is much, much better.

Freshly painted, looking 50 years old. Love it!

Milk paint is awesome in how it antiques itself. Depending on the gloss of the previous finish, it chips as it dries. My cabinet wasn’t very glossy, so I aided the process just a tiny bit with a putty knife. It looks like it’s been sitting in someone’s barn for 50 years, but the finish is smooth and cured.

I’ll admit, I drug my feet in starting this project because I feared the effort that would go into making it look like I had it pictured in my head. It turned out to be so easy, I am eyeing my next project!

Milk or Chalk?

After we had been back in the States for a while, we knew God was calling us to plant in Orlando. We were reluctant to say the least. Orlando? We began house hunting at the very bottom of the housing-bust. We were shocked by how cheap housing prices were, especially knowing what some co-workers had paid three years ago. Seems dreamy, doesn’t it? Unfortunately, we weren’t the only ones looking to buy a house. Because the market was so great, investors were sweeping into the area in droves. We made offers on NINE different homes and were outbid on all of them.

When we found a new home being built and discovered we could simply tell them we wanted the house, instead of going into a bidding war, we took it. In many ways, it is perfect for our family. Lots of room to grow, space in the rooms we value most, a kitchen that feels beyond extravagant. I am incredibly thankful. But there is definitely something missing. The house just doesn’t feel like. . .us. Part of it is the housing style in Florida. We’re just not Floridians. Part of it is that we doubled the square footage we had been living in for the past four years. We have way more space than we have things to fill it with.

As has been the case since we got married, we started inheriting pieces to fill our home. My parents downsizing into their retirement came at a convenient time! We were careful with what we took, but there was one piece we needed more than we loved. My parents had it built to put by the front door to store our book bags and coats from school. We desperately needed the same type of storage. Unfortunately, my mom had been in a huge “country” phase when the piece was built, which is definitely not my style.

I have been itching to refurbish it since it arrived by my front door. On a recent trip to NYC, my friend Sharon told me about the new rage in furniture refurbishment–milk paint and chalk paint. Paints that instantly make furniture look shabby chic.

Milk Paint

Chalk Paint

My friend couldn’t say enough about these paints. Milk paint is VOC free. Chalk paint is virtually so. They require no priming and only look better with wear. My cabinet is calling! But what do I go with? Milk or chalk? And where the heck do I find these magic makeover products?

Apparently, Miss Mustard Seed is the go-to gal for milk paint. Her blog is delightful in every way. She markets her own line of milk paint, and I’m trying to track down a local distributor. Annie Sloan seems to be the chalk paint expert. Chalk paint has been around a little longer, so it’s a little more distributed. None the less, I can’t get it at Home Depot.

Stay tuned for the great refurbishment journey! I am a reluctant DIYer. I know I can do it, but I love closure so much, I can’t seem to get started. Three little ones will definitely make this a multi-day project. 🙂 My desire for change is weighing heavier than my need for closure though. Oh, it’s going to look so cool!